Settings Homepage
The homepage displays specific information about your Corsair domain.
Note
Only 3PL users can change the domain name.
On the homepage, in the General Settings section, select Edit.
In the Name text field, enter a name and select Save.
Note
Only 3PL users can change the parent domain.
On the homepage, in the General Settings section, select Edit.
In the Parent drop-down list, select a domain name.
Select Save.
On the homepage, in the General Settings section, select Edit.
In the Cost Allocation drop-down list, select a cost allocation method.
Select Save.
Note
For more information about cost allocation, see Cost allocation in a multi-stop shipment.
On the homepage, in the General Settings section, select Edit.
Select the Freight Allowance Enabled toggle option.
Note
This option applies only to shipments created after you select the option - not to shipments created prior to you selecting it.
You can set a shipment workflow rule to require the actual arrival and departure times for shipments.
On the homepage, in the General Settings section, select Edit.
Select the Require Both Arrival and Departure On Stops toggle option.
This is the avatar, logo, and color displayed on your customer's invoices.
On the homepage, in the Logo & Colors section, select Edit. The Logo & Colors dialog box displays.
Make your changes, and select Save.
Note
Only non-3PL users can change the BOL settings.
On the homepage, in the BOL Settings section, select Edit. The BOL Settings dialog box displays.
Select the type of number you want to display as a barcode on the BOL.
Select the types of reference numbers you want to display in the Additional Info section on the BOL.
Select Save.
Note
Only non-3PL users can change the shipping label settings.
On the homepage, in the Shipping Label Settings section, select Edit. The Shipping Label Settings dialog box displays.
Optionally select the types of reference numbers you want to display on the shipping label.
Optionally select the default parcel label sizes you want, if you ship parcels.
Select Save.
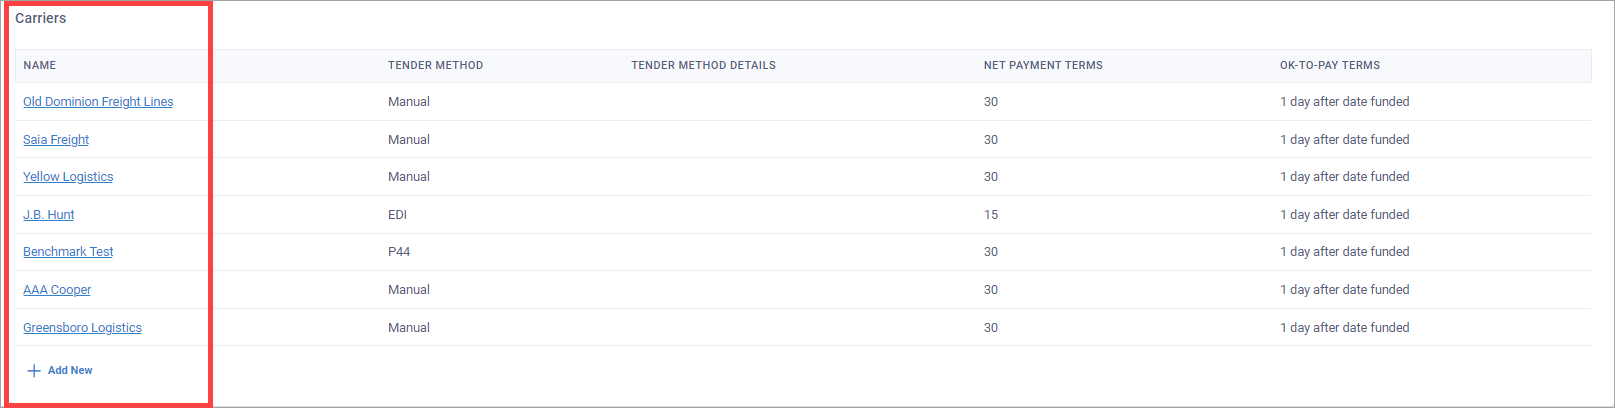
On the homepage, in the Carriers section, you can view a list of the carriers assigned to your domain.
Note
The parent domain sets the list of carrier names you can choose from. See Add a Carrier for more information.
On the homepage, in the Carriers section, select Add New. The New Carrier Assignment dialog box displays.
Enter the carrier information and select Save. See the "New Carrier Assignment Field Descriptions" below for more information about the carrier assignment fields.
New Carrier Assignment Field Descriptions
On the homepage, in the Carriers section, select a carrier. The Edit Carrier Assignment dialog box displays.
Edit the carrier information and select Save. See the "Edit Carrier Assignment Field Descriptions" below for more information about the carrier assignment fields.
Edit Carrier Assignment Field Descriptions
You can set which shipment-related documents are required to be posted in Corsair before all the fees associated with a shipment will be paid. This action is per carrier.
On the homepage, in the Carriers section, select a carrier. The Edit Carrier Assignment dialog box displays.
In the Required Document Types drop-down list, select one or more documents you want to be required for shipments handled by the carrier.
Select Save.
On the homepage, in the Carriers section, select a carrier. The Edit Carrier Assignment dialog box displays.
Select Delete > Yes.
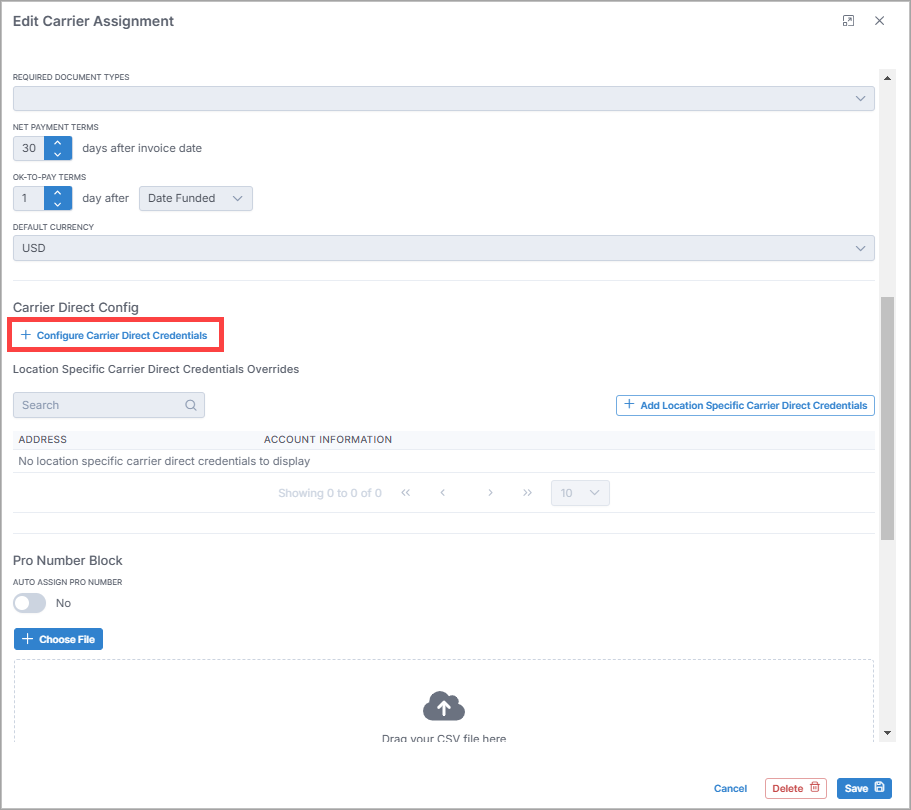
If you have an account with a carrier, you can set up a carrier direct integration to receive rate quotes in Corsair through the carrier’s API.
Note
The carrier direct integration also begins attempting to retrieve the following shipment information automatically after the shipment is picked up:
Required documents (added to the Documents section on the Details for Shipment page).
Tracking updates from the carrier (added to the Events & Milestones section on the Details for Shipment page).
The attempts to retrieve this shipment information stops automatically one week after the last invoice for the shipment is paid.
Select the domain in which you want to set up the carrier integration.
Select a carrier name.
Note
If the carrier name doesn’t display in the Carriers section:
Select Add New below the list of carriers.
Enter the carrier information and select Save.
Proceed from Step 3 above by selecting the carrier name.
In the Edit Carrier Assignment dialog box, select Configure Carrier Direct credentials.
Note
If you don’t see the Configure Carrier Direct Credentials option, it means direct carrier integration isn’t currently available for that carrier.
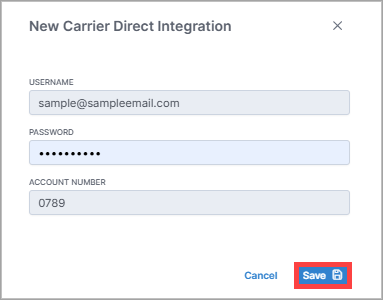
Enter your account information for the carrier, and select Save.
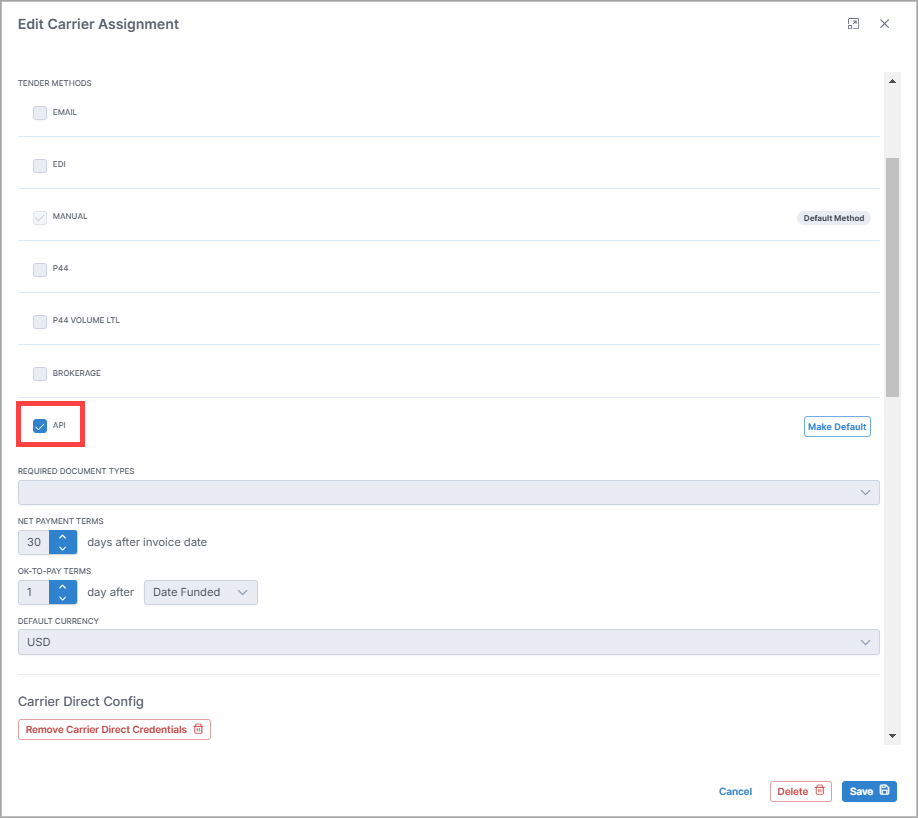
Optional: If you also want to include tendering with that same client-carrier combination, scroll up and set the tender method to API.
Optional: You can configure location-specific carrier direct credentials that override the default credentials.
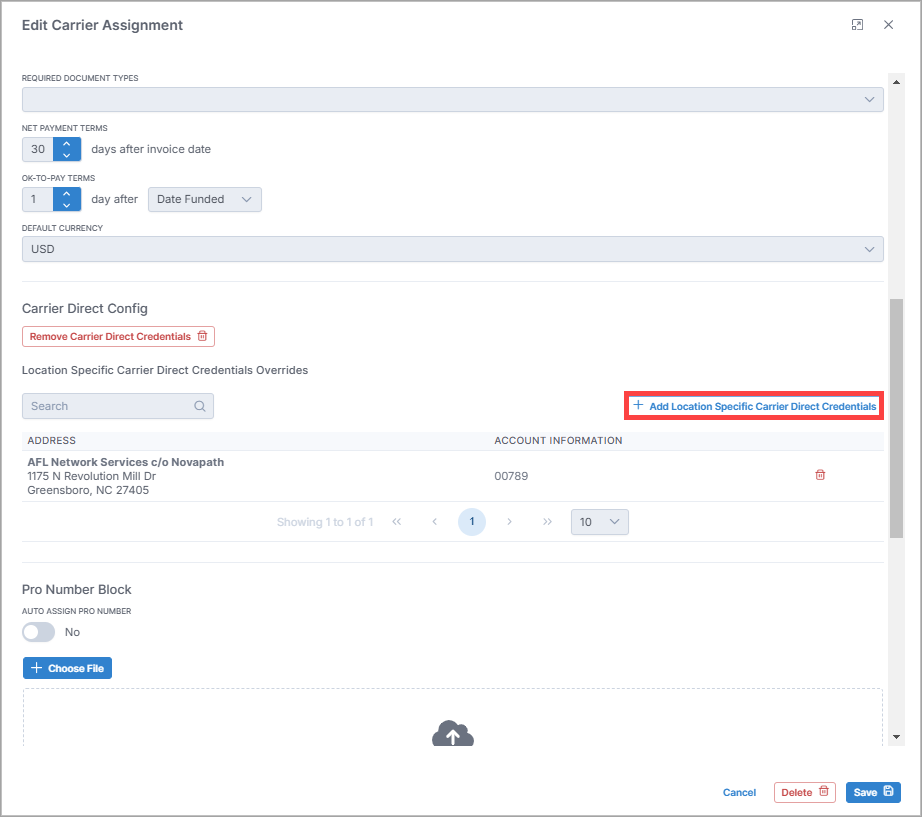
Select Save.
You must add a rate contract for the carrier. In the sidebar, select Rating > Contract Manager. The Contract Manager page displays.
Select New Contract.

On the New Contract page, enter the contract information.
Note
In the Rate Strategy drop-down list, select CARRIER_DIRECT.
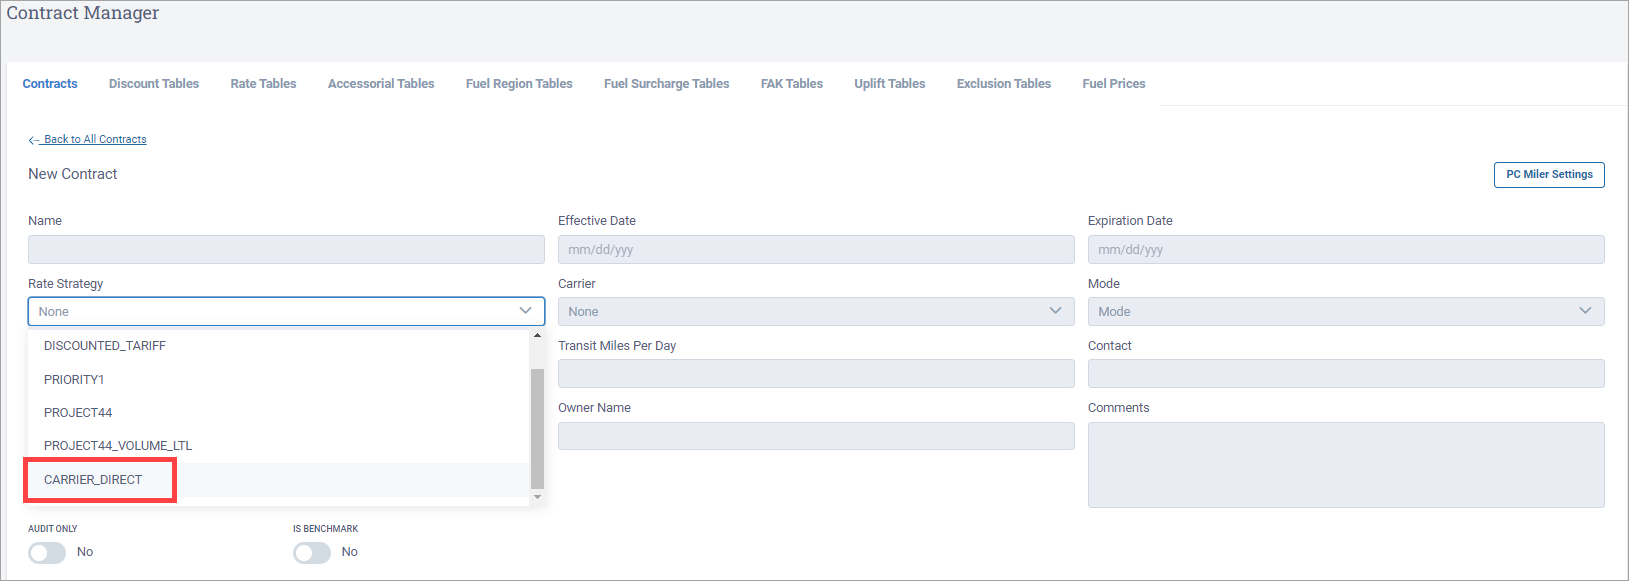
Select Save Changes.
Note
If you added the rate contract in a different domain than the one you configured the carrier integration credentials (such as that domain’s 3PL), be sure to share the rate contract with the domain that has the carrier integration credentials configured.
After you configure the carrier direct integration in a domain, the rating in that domain attempts to get rates directly through the carrier’s API.
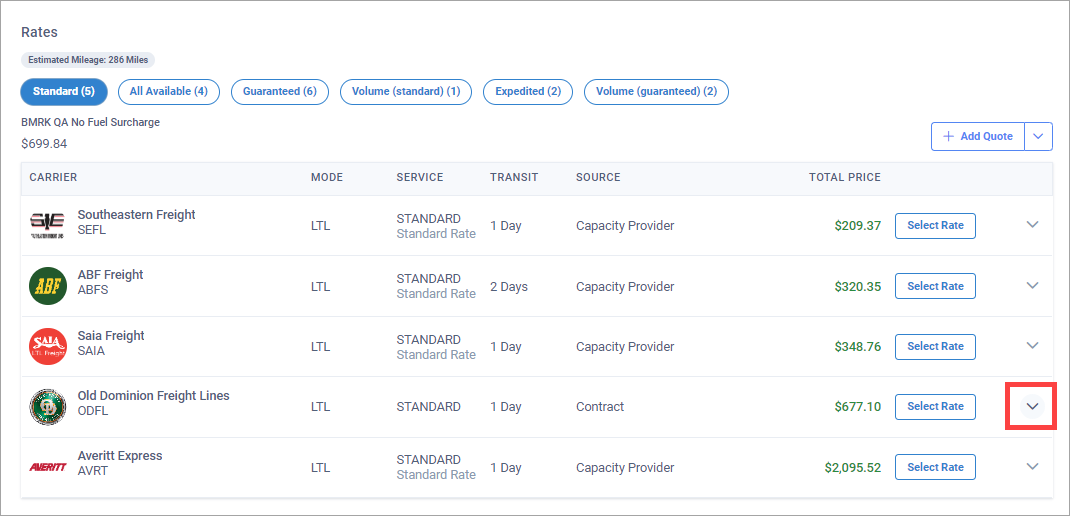
In Corsair TMS, in the Rates section for a pending order, you can verify which carrier rates were retrieved by carrier API’s.
In the sidebar, select Corsair TMS > Order. The Orders page displays a list of all orders.
In the ID column, select the Order ID of an order. The Details for Order page displays.
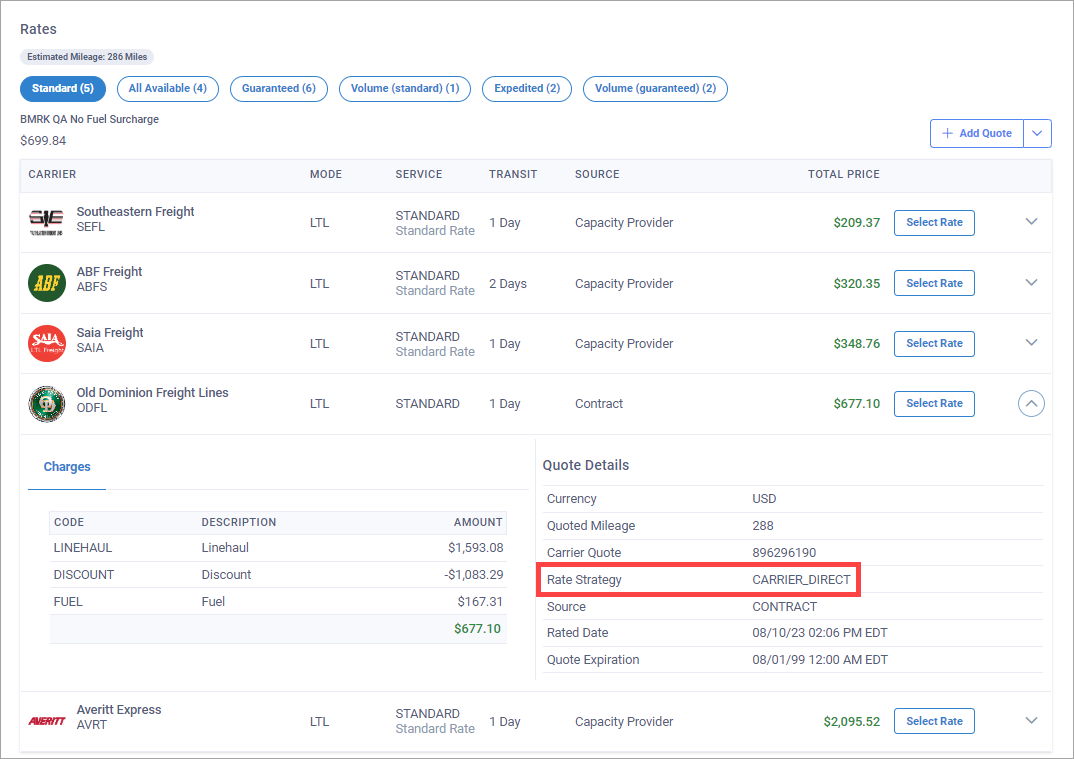
In the Rates section, select the drop-down arrow for a carrier.
If the carrier rate was retrieved through the carrier’s API, the Rate Strategy is CARRIER_DIRECT.
Select the domain from which you want to remove the carrier integration.
Select a carrier name.
In the Edit Carrier Assignment dialog box, select Remove Carrier Direct credentials.
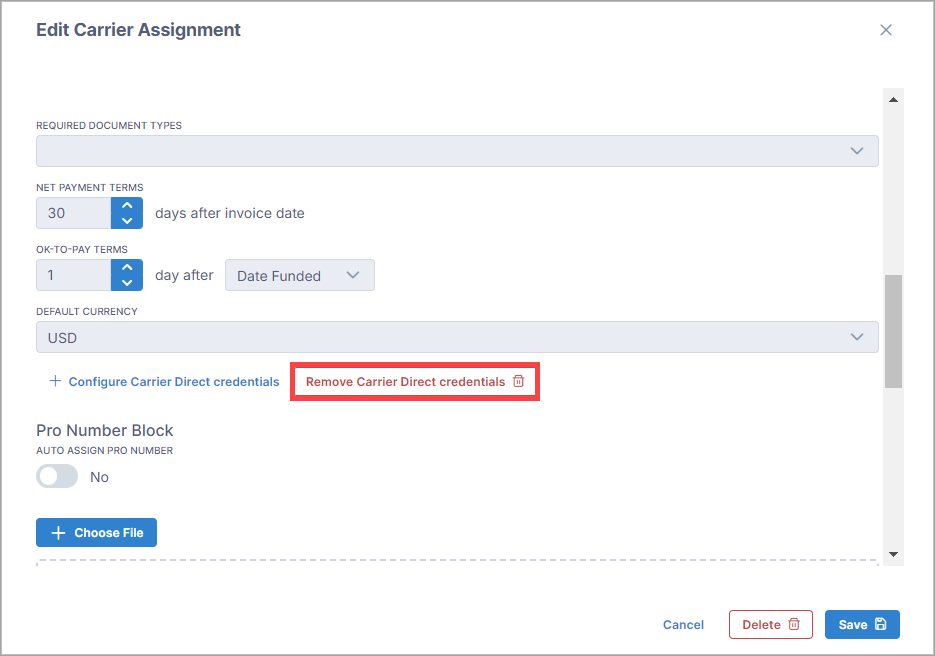
Select Save.
On the homepage, in the Brokers section, you can view a list of the brokers assigned to your domain.
Note
The parent domain sets the list of carrier names you can choose from. See Add a Broker for more information.
On the homepage, in the Brokers section, select Add New. The New Broker Assignment dialog box displays.
Enter the broker information and select Save. See the "New Broker Assignment Field Descriptions" below for more information about the broker assignment fields.
New Broker Assignment Field Descriptions
Field | Description |
|---|---|
Broker | The name of the broker. |
Do Not Dispatch | If Yes, you can't do the following to this broker:
|
Tender Method | The method of communication for sending tender requests to the broker.
|
Required Document Types | The types of documents required to be posted in Corsair before all the fees associated with a shipment are paid. NoteThe broker invoices for a shipment will have a Hold status that won't change to Ready For Billing until all required documents are posted in Corsair. |
Net Payment Terms | The number of days payment is due to the broker after the broker sends its invoice. |
Ok-To-Pay Terms | Terms for when to release payment to the broker. |
Default Currency | Select an international currency unit. |
On the homepage, in the Brokers section, select a broker. The Edit Broker Assignment dialog box displays.
Edit the broker information and select Save. See the "Edit Broker Assignment Field Descriptions" below for more information about the broker assignment fields.
Edit Broker Assignment Field Descriptions
Field | Description |
|---|---|
Broker | The name of the broker. |
Do Not Dispatch | If Yes, you can't do the following to this broker:
|
Tender Method | The method of communication for sending tender requests to the broker. |
Required Document Types | The types of documents required to be posted in Corsair before all the fees associated with a shipment are paid. NoteThe broker invoices for a shipment will have a Hold status that won't change to Ready For Billing until all required documents are posted in Corsair. |
Net Payment Terms | The number of days payment is due to the broker after the broker sends its invoice. |
Ok-To-Pay Terms | Terms for when to release payment to the broker. |
Default Currency | Select an international currency unit. |
On the homepage, in the Brokers section, select a broker. The Edit Broker Assignment dialog box displays.
Select Delete > Yes.
On the homepage, in the Assigned Contacts section, you can view a list of the contacts assigned to your domain.
Note
The parent domain sets the list of carrier names you can choose from. See Add a Contact for more information.
On the homepage, in the Assigned Contacts section, select Add New. The New Contact Assignment dialog box displays.
Enter the contact information and select Save.
On the homepage, in the Assigned Contacts section, select a contact. The Edit Assigned Contact dialog box displays.
Edit the broker information and select Save.
On the homepage, in the Assigned Contacts section, select a contact. The Edit Assigned Contact dialog box displays.
Select Delete > Yes.