Endpoints
Endpoints are components that send and receive messages to and from external systems. There are various types of endpoints, such as REST, SOAP, FTP, and more.
You'll create and configure endpoints to use in integration message flows.
The Endpoints page is where you can view and add your endpoints.
On the Endpoints page, view the list of endpoints.
Search for an endpoint
On the Endpoints page, you can search for a specific endpoint using the default search fields.

In the top right corner of the page, select New Endpoint.

In the Create New Endpoint dialog box, enter the initial endpoint information, and select Next.
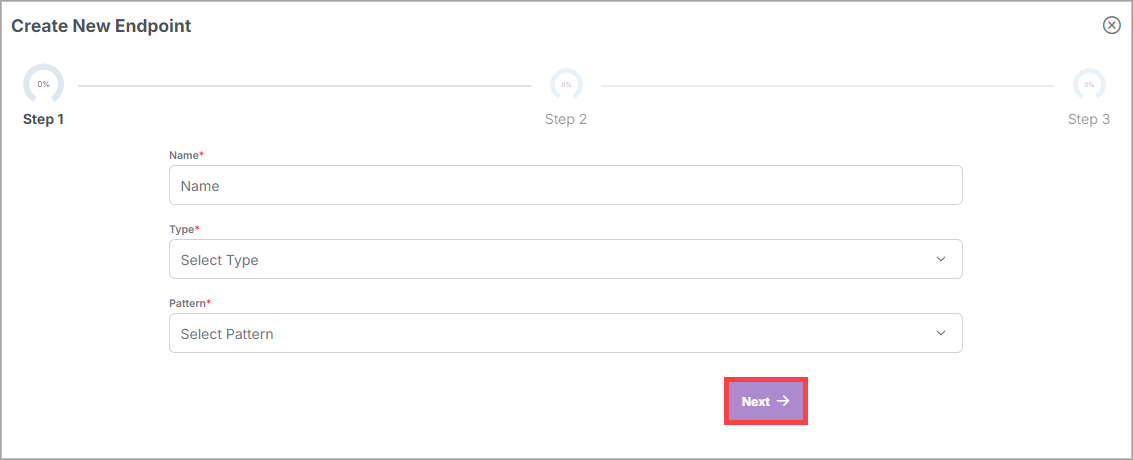
Continue entering the additional endpoint information and then selecting Next until you reach the final step.
Select Create Endpoint. The Endpoint Details page displays as a draft version of the endpoint.
In the top right corner of the page, select Approve > Yes to approve the draft.
If the Peer Review feature is enabled in General Settings, the endpoint must be approved by a peer with the Manager role or higher before it can be activated.
The endpoint has the name you gave it and an ID that X1 automatically assigned to it, based on the name.
The ID is lowercase and replaces spaces with dashes, and it's also permanent and can't be edited.
Note
If you want to delete the draft before approving it, select
 .
.
See the tables below for more information about creating each type of endpoint.
Refer to the table below for guidance beginning with Step 3 in the Create an endpoint procedure above.
Steps and fields | Description |
|---|---|
Step 1 |
|
Name | Enter a relevant name for the endpoint. |
Type | The type of endpoint determines many of the unique configuration properties and behavior of the endpoint: REST - Representational State Transfer. REST endpoints send and receive messages using the HTTP protocol. REST endpoints can be configured to send and receive messages using a variety of HTTP methods, including GET, POST, PUT, and DELETE. REST endpoints can also be configured to send and receive messages using a variety of content types, including JSON, XML, and more. |
Pattern | The pattern of an endpoint determines how the endpoint can be used:
NoteAll message flows must start with a consumer endpoint that triggers a message flow run when it receives a message from an external system and will have at least one producer endpoint that sends a message to an external system. |
Step 2 |
|
Adapter | The name of the context that the endpoint runs in. |
Request Document Type | The document type passed into the endpoint by an external system. |
Response Document Type | The document type returned to an external system by the endpoint after processing. |
Step 3 | |
Protocol | The protocol the endpoint uses: HTTP or HTTPS. |
HTTP Method | The HTTP method the endpoint uses: GET, POST, PUT, PATCH, or DELETE. |
URI Base | The base URI the endpoint uses. This is the base URL that the endpoint uses to send and receive messages. For consumer endpoints, this property is determined by the adapter that hosts the endpoint and is read only as it serves for display purposes so that the user can see the base URL of the endpoint. |
Path | The URI path of the endpoint that's appended to the URI base. |
Content Type | The format of the content passing through the endpoint, such as JSON, XML, and so on. |
Step 4 | NoteThis step is available for REST consumers only. |
Selector Type | Every message that X1 receives is from a sending trading partner to a receiving trading partner. As a message processing system, X1 must know which trading partner is sending the message in order to process it correctly. A consumer endpoint accomplishes this through the configuration of trading partner selectors. A consumer endpoint must identify which trading partner a received message belongs to in order to properly configure the message flow. The correct trading partner is identified according to its trading partner code. The trading partner code can be a constant value that's set for the endpoint, or the trading partner code can be extracted from the message's body using a Groovy script. Select one of the following options to determine how the endpoint identifies the sender and receiver of the message:
|
Value | Enter a sender value and a receiver value. |
Step 5 | NoteThis step is available for REST consumers only. |
Authorization Type | Select one of the following Authorization Types:
|
After you create the endpoint, its details page displays where you can add additional information about the endpoint before approving it.
Refer to the table below for guidance after you create the endpoint but before you approve the endpoint (between Steps 5 and 6 in the Create an endpoint procedure above).
This table provides the name of each tab that contains additional fields on the Endpoint Details page.
Tabs and fields | Description |
|---|---|
General tab | |
Is Expose Spec? | NoteThis option is available for REST consumers only. Optional: If yes, expose the OpenAPI specification for the endpoint so that it's available at the URI path of the endpoint with the suffix /spec. |
Port | Optional NoteThis option is available for REST producers only. |
Response Content Type | Optional: Override the response content type from a sender. NoteThis option is available for REST producers only. |
HTTP Query | NoteThis option is available for REST producers only. Optional: An HTTP query with parameters separated with an ampersand (&). You can script the values using Camel simple expressions. For example: param1=foo¶m2=${header.bar} |
Authorization tab | |
Authorization Type |
|
Trading Partner Selector tab | NoteThis option is available for REST consumers only. |
Payload tab | |
Unwrap? | If Yes, a message that X1 sends to an external system is unwrapped from its envelope. |
Log Message Headers | You can log the message headers of the message for any events that the endpoint logs. If yes, you can enter an optional "Include Headers" regular expression to specify which headers to include in the logged event. All headers are logged if you don't provide the regular expression. NoteLogging message headers can be helpful in troubleshooting, but be aware that this can expose sensitive information in the flow run events. |
Throttle Messages | If Yes, you can set the number of messages sent by the endpoint within a specific time window. Messages that exceed the limit set for the time window are delayed. This is useful when the target service has a rate limit or other restrictions on the number of messages that can be sent in a given time period. |
Split? | If Yes, a message received by X1 from an external system is split into multiple individual messages and processed separately. In the On field, you must provide a split key which is a property in the message body to split on. |
Send Body As Query Params? | NoteThis option is available for REST producers only. Send the document in the message body as URI query parameters. |
Validate Schema? | If yes, the message body should be validated against the schema of the document type. Any incoming message will be validated against the schema of the document type for the message. If the message doesn't conform to the schema, it'll throw an error. NoteBefore selecting this option, be sure to add the JSON or XML schema to the Document Type that the endpoint receives. |
Save Raw Payload? | If Yes, the raw payload of the message will be saved as a file, which can be viewed under the Files context window option for Flow Runs. |
Delay Sending | NoteThis option is available for REST producers only. Optional: The amount of time, in seconds, you can delay sending messages.
|
Custom Headers tab | NoteThis tab is available for REST producers only. |
New Custom Header | You can use a key-value pair to add a custom header to any request sent by the endpoint. The header can be one of the following:
To use a DSL that references a vault secret or generates a cryptographic signature, enter the corresponding DSL. The following DSLs are supported in custom headers:
To create a new custom header, select New Custom Header. The New Custom Header dialog box displays:
Select Save. |
Error Handling tab | |
Custom Error Handler? | If yes, you can add custom error handling to determine how errors are handled for the endpoint. Select the type and name of the error handler. |
Spec tab | NoteThis tab is available for REST consumers only. Enter your OpenAPI schema. |
Flows tab | Displays all the integrations and integration flows that use this endpoint. Double-select a flow to view its details. |
FTP consumers are configured to poll an FTP server at regular intervals to check for new messages. When a new message is found, the consumer will download the message and process it. FTP consumers are used to receive messages from an FTP server.
When a file is downloaded and processed by an FTP Consumer, the file name is stored in a message header under the filename key, which is intended to be a read-only helper variable and should not be modified. This enables you to access the file name in the subsequent integration steps. For example, if an FTP Consumer downloads a file named myFile.txt, the filename header is set to myFile.txt. You can access the filename header in subsequent integration steps by accessing the `messageHeaders.filename`.
FTP Producers are configured to send messages to an FTP server. When a message is sent to the producer, the producer will send the message to the FTP server. FTP Producers are used to send messages to an FTP server.
Refer to the table below for guidance beginning with Step 3 in the Create an endpoint procedure above.
Steps and fields | Description |
|---|---|
Step 1 | |
Name | Enter a relevant name for the endpoint. |
Type | The type of endpoint determines many of the unique configuration properties and behavior of the endpoint: FTP - File Transfer Protocol. FTP endpoints send and receive messages using the FTP or FTPS protocol. You can configure common FTP properties such as host and directory. |
Pattern | The pattern of an endpoint determines how the endpoint can be used:
NoteAll message flows must start with a consumer endpoint that triggers a message flow run when it receives a message from an external system and will have at least one producer endpoint that sends a message to an external system. |
Step 2 | |
Adapter | The name of the context that the endpoint runs in. |
Request Document Type | The document type passed into the endpoint by an external system. |
Step 3 | |
Protocol | Select either FTP or SFTP. NoteSFTP endpoints are configured similarly to FTP endpoints, but with the following difference:
|
Directory | The directory of the endpoint that is appended to the URI base. |
Step 4 | |
Selector Type | Every message that X1 receives is from a sending trading partner to a receiving trading partner. As a message processing system, X1 must know which trading partner is sending the message in order to process it correctly. A consumer endpoint accomplishes this through the configuration of trading partner selectors. A consumer endpoint must identify which trading partner a received message belongs to in order to properly configure the message flow. The correct trading partner is identified according to its trading partner code. The trading partner code can be a constant value that's set for the endpoint, or the trading partner code can be extracted from the message's body using a Groovy script. Select one of the following options to determine how the endpoint identifies the sender and receiver of the message:
|
Value | Enter a sender value and a receiver value. |
After you create the endpoint, its details page displays where you can add additional information about the endpoint before approving it.
Refer to the table below for guidance after you create the endpoint but before you approve the endpoint (between Steps 5 and 6 in the Create an endpoint procedure above).
This table provides the name of each tab that contains additional fields on the Endpoint Details page.
Tabs and fields | Description |
|---|---|
General tab | |
Host | The FTP host name that the endpoint will send and receive messages to and from. |
Port | NoteThis option is available for FTP producers only. Optional: The FTP port that the endpoint will send and receive messages to and from. |
Is Passive? | If yes, uses passive mode. |
Is Recursive? | If yes, the consumer polls folders under the specified directory. Folders named Done or Error are excluded as well as subfolders of the polled folders. |
File Name Script | NoteThis option is available for FTP producers only. Optional: A Groovy script used to determine the name of the file sent to the remote server. The script must return a string that represents the name of the file to be sent. The script has access to the message body and headers. Examples:
|
Polling Delay | NoteThis option is available for FTP consumers only. Optional: The amount of time, in seconds, between polling the FTP server for new messages.
It's set in milliseconds in the database but is displayed here in seconds. |
Delete After Consumption? | NoteThis option is available for FTP consumers only. If yes, consumed files are moved to a Done folder after consumption. |
Authorization tab | |
Authorization Type |
|
Trading Partner Selector tab | This option is available for FTP consumers only. |
Payload tab | |
Log Message Headers | You can log the message headers of the message for any events that the endpoint logs. If yes, you can enter an optional "Include Headers" regular expression to specify which headers to include in the logged event. All headers are logged if you don't provide the regular expression. NoteLogging message headers can be helpful in troubleshooting, but be aware that this can expose sensitive information in the flow run events. |
Split? | If Yes, a message received by X1 from an external system is split into multiple individual messages and processed separately. In the On field, you must provide a split key which is a property in the message body to split on. |
Is CSV? | NoteThis option is available for FTP consumers only. If yes, the message contains multiple documents, each on a new line delimited by a character. |
Custom Headers tab | NoteThis tab is available for FTP producers only. |
New Custom Header | You can use a key-value pair to add a custom header to any request sent by the endpoint. To create a new custom header, select New Custom Header. The New Custom Header dialog box displays:
Select Save. |
Error Handling tab | |
Custom Error Handler? | If yes, you can add custom error handling to determine how errors are handled for the endpoint. Select the type and name of the error handler. |
Spec tab | NoteThis tab is available for REST consumers only. Enter your OpenAPI schema. |
Flows tab | Displays all the integrations and integration flows that use this endpoint. Double-select a flow to view its details. |
Rabbit consumers "consume" messages from a message queue, while producers "produce" or publish messages to a message queue. Consumers receive a message from a queue whenever the RabbitMQ message broker has a message to deliver. At the same time, producers send a message to a queue whenever they receive a message from another component.
Since Rabbit is not request/response, Rabbit endpoints only provide the ability to configure the Request Document Type, which represents the input document type that the consumer sends (in the case of a producer) or receives (in the case of a consumer). There is no response (output) document type for Rabbit endpoints.
Refer to the table below for guidance beginning with Step 3 in the Create an endpoint procedure above.
Steps and fields | Description |
|---|---|
Step 1 |
|
Name | Enter a relevant name for the endpoint. |
Type | The type of endpoint determines many of the unique configuration properties and behavior of the endpoint: RABBIT - Message queue software. Rabbit endpoints send and receive messages using the AMQP protocol over RabbitMQ message queues. |
Pattern | The pattern of an endpoint determines how the endpoint can be used:
NoteAll message flows must start with a consumer endpoint that triggers a message flow run when it receives a message from an external system and will have at least one producer endpoint that sends a message to an external system. |
Step 2 |
|
Adapter | The name of the context that the endpoint runs in. |
Request Document Type | The document type passed into the endpoint by an external system. |
Step 3 | |
Exchange | The RabbitMQ exchange that the endpoint will send and receive messages to or from. |
Queue | NoteThis option is available for Rabbit consumers only. The RabbitMQ queue that consumer endpoints receive messages from. |
Auto Create Exchange and Queue? | NoteThis option is available for Rabbit consumers only. The exchange and queue are created automatically, if they don't already exist. |
Routing Key | NoteThis option is available for Rabbit producers only. The routing key the producer endpoint uses to send messages to the exchange. |
Step 4 | NoteThis step is available for Rabbit consumers only. |
Selector Type | Every message that X1 receives is from a sending trading partner to a receiving trading partner. As a message processing system, X1 must know which trading partner is sending the message in order to process it correctly. A consumer endpoint accomplishes this through the configuration of trading partner selectors. A consumer endpoint must identify which trading partner a received message belongs to in order to properly configure the message flow. The correct trading partner is identified according to its trading partner code. The trading partner code can be a constant value that's set for the endpoint, or the trading partner code can be extracted from the message's body using a Groovy script. Select one of the following options to determine how the endpoint identifies the sender and receiver of the message:
|
Value | Enter a sender value and a receiver value. |
After you create the endpoint, its details page displays where you can add additional information about the endpoint before approving it.
Refer to the table below for guidance after you create the endpoint but before you approve the endpoint (between Steps 5 and 6 in the Create an endpoint procedure above).
This table provides the name of each tab that contains additional fields on the Endpoint Details page.
Tabs and fields | Description |
|---|---|
General tab | |
Use Dead Letter Queue? | NoteThis option is available for Rabbit producers only. Optional: If yes, enables monitoring of a dead letter queue for messages that fail to be processed by the downstream system. Select the exchange name and queue name of the dead letter queue. Any dead letters are correlated using the CorrelationID message header. |
Concurrent Consumers | NoteThis option is available for Rabbit consumers only. You can configure Rabbit consumer endpoints with multiple concurrent consumers to increase throughput for high-volume flows. This allows multiple consumers to process messages from the same queue in parallel. You can set the number of concurrent consumers. The default value is 1 and the max is 100. |
Prefetch Count | NoteThis option is available for Rabbit consumers only. The number of messages that will be prefetched by the consumer. Defaults to 1. |
Async Consumer | If Yes, the consumer will be asynchronous. Defaults to No. You can configure Rabbit consumer endpoints to be asynchronous. When you use an asynchronous consumer endpoint, the consumer won't wait until the message is processed before acknowledging it. Instead, the asynchronous consumer acknowledges the message immediately. This allows the consumer to process messages in parallel, increasing throughput for high-volume flows. NoteMixing concurrent consumers and asynchronous processing can overwhelm the downstream system if not properly configured. We recommend you test the flow with different configurations to determine the optimal settings for your use case. |
Authorization tab | NoteThis option is available for Rabbit producers only. |
Authorization Type |
|
Trading Partner Selector tab | This option is available for Rabbit consumers only. |
Payload tab | |
Unwrap? | If Yes, a message that X1 sends to an external system is unwrapped from its envelope. |
Log Message Headers | You can log the message headers of the message for any events that the endpoint logs. If yes, you can enter an optional "Include Headers" regular expression to specify which headers to include in the logged event. All headers are logged if you don't provide the regular expression. NoteLogging message headers can be helpful in troubleshooting, but be aware that this can expose sensitive information in the flow run events. |
Split? | If Yes, a message received by X1 from an external system is split into multiple individual messages and processed separately. In the On field, you must provide a split key which is a property in the message body to split on. |
Validate Schema? | If yes, the message body should be validated against the schema of the document type. Any incoming message will be validated against the schema of the document type for the message. If the message doesn't conform to the schema, it'll throw an error. |
Save Raw Payload? | If Yes, the raw request is saved whether or not it contains security credentials. This is used for debugging purposes. |
Delay Sending | NoteThis option is available for Rabbit producers only. Optional: The amount of time, in seconds, you can delay sending messages.
|
Custom Headers tab | NoteThis tab is available for Rabbit producers only. |
New Custom Header | You can use a key-value pair to add a custom header to any request sent by the endpoint. To create a new custom header, select New Custom Header. The New Custom Header dialog box displays:
Select Save. |
Error Handling tab | |
Custom Error Handler? | If yes, you can add custom error handling to determine how errors are handled for the endpoint. Select the type and name of the error handler. |
Flows tab | Displays all the integrations and integration flows that use this endpoint. Double-select a flow to view its details. |
Refer to the table below for guidance beginning with Step 3 in the Create an endpoint procedure above.
Steps and fields | Description |
|---|---|
Step 1 |
|
Name | Enter a relevant name for the endpoint. |
Type | The type of endpoint determines many of the unique configuration properties and behavior of the endpoint: SOAP - Simple Object Access Protocol. SOAP endpoints send and receive SOAP XML messages using the HTTP protocol. You can configure SOAP endpoints to send and receive messages using a variety of SOAP operations that also let you configure the SOAP envelope and body of the message to exchange SOAP-compliant XML. |
Pattern | The pattern of an endpoint determines how the endpoint can be used:
NoteAll message flows must start with a consumer endpoint that triggers a message flow run when it receives a message from an external system and will have at least one producer endpoint that sends a message to an external system. |
Step 2 | |
Adapter | The name of the context that the endpoint runs in. |
Request Document Type | The document type passed into the endpoint by an external system. |
Response Document Type | The document type returned to an external system by the endpoint after processing. |
Step 3 | |
Protocol | The protocol of the endpoint. Either HTTP or HTTPS. Defaults to HTTP. |
URI Base | The base URI of the endpoint. This is the base URL that the endpoint will use to send and receive messages. NoteFor SOAP consumers, this property is determined by the adapter that hosts the endpoint and is read-only because it serves for display purposes so that you can view the base URL of the endpoint. NoteSOAP endpoints support the use of Camel simple expressions in the URI base property. This enables you to set dynamically set the URI Base based on the message being processed. For example, to set the URI Base to http://example.com and the Path to /orders/${order-id} where order-id is a property of the message body, you would use http://example.com for the URI Base and /orders/${body.orderId} for the Path. Both the message body and headers are available for use in the expressions. |
Path | The URI path of the endpoint that's appended to the URI base. NoteSOAP endpoints support the use of Camel simple expressions in the URI base property. This enables you to set dynamically set the URI Base based on the message being processed. For example, to set the URI Base to http://example.com and the Path to /orders/${order-id} where order-id is a property of the message body, you would use http://example.com for the URI Base and /orders/${body.orderId} for the Path. Both the message body and headers are available for use in the expressions. |
Namespace | A unique identifier used to prevent naming conflicts by qualifying the elements and attributes in XML documents. |
Operation | A specific action or function that a SOAP web service can perform that's defined in the WSDL (Web Services Description Language). |
Envelope Prefix | The prefix of the envelope elements. Example: <soapenv: Envelope>, where soapenv is the prefix. |
Step 4 | NoteThis option is available for SOAP consumers only. |
Selector Type | Every message that X1 receives is from a sending trading partner to a receiving trading partner. As a message processing system, X1 must know which trading partner is sending the message in order to process it correctly. A consumer endpoint accomplishes this through the configuration of trading partner selectors. A consumer endpoint must identify which trading partner a received message belongs to in order to properly configure the message flow. The correct trading partner is identified according to its trading partner code. The trading partner code can be a constant value that's set for the endpoint, or the trading partner code can be extracted from the message's body using a Groovy script. Select one of the following options to determine how the endpoint identifies the sender and receiver of the message:
|
Value | Enter a sender value and a receiver value. |
Step 5 | NoteThis option is available for SOAP consumers only. |
Authorization Type | Select one of the following Authorization Types:
|
After you create the endpoint, its details page displays where you can add additional information about the endpoint before approving it.
Refer to the table below for guidance after you create the endpoint but before you approve the endpoint (between Steps 5 and 6 in the Create an endpoint procedure above).
This table provides the name of each tab that contains additional fields on the Endpoint Details page.
Tabs and fields | Description |
|---|---|
General tab | |
Operation Prefix | Optional: The prefix of the operation element. Example: <pre: getRate>, where pre is the prefix. |
Header Namespace | Optional: A unique identifier used to prevent naming conflicts by qualifying elements in the SOAP header. |
Header Prefix | Optional: The prefix of the header element. Example: <pre: header>, where pre is the prefix. |
Prefix Elements? | Optional:
|
Envelope Prefix | The prefix of the SOAP envelope elements. Example: <soapenv: Envelope>, where soapenv is the prefix. |
Response Key | NoteThis option is available for SOAP producers only. Optional: The key in the response document that contains the response data. Use it to select only a portion of the response. |
Request Key | NoteThis option is available for SOAP consumers only. Optional: The key in the request document that contains the request data. Use it to select only a portion of the request. |
WSDL | NoteThis option is available for SOAP consumers only. Optional: The key in the request document that contains the request data. Use it to select only a portion of the request. |
Action | NoteThis option is available for SOAP producers only. Optional: The SOAPAction HTTP request header field can be used to indicate the intent of the SOAP HTTP request. The value is a URI identifying the intent. SOAP places no restrictions on the format or specificity of the URI or that its resolvable. An HTTP client must use this header field when issuing a SOAP HTTP request. |
Include Attachments? | NoteThis option is available for SOAP producers only. Optional: Enables adding attachments to the SOAP message. |
Delay Sending | NoteThis option is available for SOAP producers only. Optional: The amount of time, in seconds, you can delay sending messages.
|
Port | NoteThis option is available for SOAP producers only. Optional: The port number the endpoint connects to. If you leave it blank, it defaults to the standard HTTP port. |
Envelope Namespaces tab | NoteThis tab is available for SOAP producers only. |
Authorization tab | Note
|
Authorization Type |
NoteThis option is available for SOAP producers only.
|
Trading Partner Selector tab | This option is available for SOAP consumers only. |
Payload tab | |
Unwrap? | If Yes, a message that X1 sends to an external system is unwrapped from its envelope. |
Log Message Headers | You can log the message headers of the message for any events that the endpoint logs. If yes, you can enter an optional "Include Headers" regular expression to specify which headers to include in the logged event. All headers are logged if you don't provide the regular expression. NoteLogging message headers can be helpful in troubleshooting, but be aware that this can expose sensitive information in the flow run events. |
Throttle Messages | If Yes, you can set the number of messages sent by the endpoint within a specific time window. Messages that exceed the limit set for the time window are delayed. This is useful when the target service has a rate limit or other restrictions on the number of messages that can be sent in a given time period. |
Split? | If Yes, a message received by X1 from an external system is split into multiple individual messages and processed separately. In the On field, you must provide a split key which is a property in the message body to split on. |
Validate Schema? | If yes, the message body should be validated against the schema of the document type. Any incoming message will be validated against the schema of the document type for the message. If the message doesn't conform to the schema, it'll throw an error. |
Save Raw Payload? | If Yes, the raw request is saved whether or not it contains security credentials. This is used for debugging purposes. |
Delay Sending | NoteThis option is available for SOAP producers only. Optional:The amount of time, in seconds, you can delay sending messages.
|
Custom Headers tab | NoteThis tab is available for Rabbit producers only. |
New Custom Header | You can use a key-value pair to add a custom header to any request sent by the endpoint. The header value can be one of the following:
To use a DSL that references a vault secret or generates a cryptographic signature, enter the corresponding DSL. The following DSLs are supported in custom headers:
To create a new custom header, select New Custom Header. The New Custom Header dialog box displays:
Select Save. |
Error Handling tab | |
Custom Error Handler? | If yes, you can add custom error handling to determine how errors are handled for the endpoint. Select the type and name of the error handler. |
Flows tab | Displays all the integrations and integration flows that use this endpoint. Double-select a flow to view its details. |
Google Storage endpoints are used to send and receive messages using the Google Cloud Storage service.
The Google Storage Endpoint works with the Google Cloud Storage provided by the X1 platform.
Note
Connecting to external Google Cloud Storage isn't supported.
Refer to the table below for guidance beginning with Step 3 in the Create an endpoint procedure above.
Steps and fields | Description |
|---|---|
Step 1 |
|
Name | Enter a relevant name for the endpoint. |
Type | The type of endpoint determines many of the unique configuration properties and behavior of the endpoint: Google Storage - Send and receive messages using the Google Storage API. |
Pattern | The pattern of an endpoint determines how the endpoint can be used:
NoteAll message flows must start with a consumer endpoint that triggers a message flow run when it receives a message from an external system and will have at least one producer endpoint that sends a message to an external system. |
Step 2 | |
Adapter | The name of the context that the endpoint runs in. |
Request Document Type | The document type passed into the endpoint by an external system. |
Response Document Type | The document type returned to an external system by the endpoint after processing. |
Step 3 | |
Bucket Name | The name of the Google Cloud Storage bucket that the endpoint will send and receive messages to and from. |
Directory Name | The directory name inside the bucket. |
Step 4 | NoteThis step is available for Google Storage consumers only. |
Selector Type | Every message that X1 receives is from a sending trading partner to a receiving trading partner. As a message processing system, X1 must know which trading partner is sending the message in order to process it correctly. A consumer endpoint accomplishes this through the configuration of trading partner selectors. A consumer endpoint must identify which trading partner a received message belongs to in order to properly configure the message flow. The correct trading partner is identified according to its trading partner code. The trading partner code can be a constant value that's set for the endpoint, or the trading partner code can be extracted from the message's body using a Groovy script. Select one of the following options to determine how the endpoint identifies the sender and receiver of the message:
|
Value | Enter a sender value and a receiver value. |
After you create the endpoint, its details page displays where you can add additional information about the endpoint before approving it.
Refer to the table below for guidance after you create the endpoint but before you approve the endpoint (between Steps 5 and 6 in the Create an endpoint procedure above).
This table provides the name of each tab that contains additional fields on the Endpoint Details page.
Tabs and fields | Description |
|---|---|
General tab | |
Directory Name | Optional: The directory of the endpoint that's appended to the URI base. |
Polling Delay | NoteThis option is available for Google Storage consumers only. Optional: The amount of time in seconds between polling the Google Cloud Storage bucket for new messages.
It's set in milliseconds in the database but is displayed here in seconds. |
Delete After Read? | NoteThis option is available for Google Storage consumers only. Optional: If yes, delete the object from the Google Cloud Storage bucket after it has been read. |
Object Name Script | NoteThis option is available for Google Storage producers only. Optional: A Groovy script used to determine the name of the object sent to the Google Cloud Storage bucket. The script must return a string that represents the name of the object to be sent. The script has access to the message body and headers. Examples: myFile.txt, body.fileName, headers.fileName, new Date().format('yyyyMMdd') + .txt. |
Trading Partner Selector tab | This option is available for Google Storage consumers only. |
Payload tab | |
Unwrap? | If Yes, a message that X1 sends to an external system is unwrapped from its envelope. |
Log Message Headers | You can log the message headers of the message for any events that the endpoint logs. If yes, you can enter an optional "Include Headers" regular expression to specify which headers to include in the logged event. All headers are logged if you don't provide the regular expression. NoteLogging message headers can be helpful in troubleshooting, but be aware that this can expose sensitive information in the flow run events. |
Split? | If Yes, a message received by X1 from an external system is split into multiple individual messages and processed separately. In the On field, you must provide a split key which is a property in the message body to split on. |
Decode Base64? | If yes, decode the message body from Base64. The message body is decoded from Base64 before being sent to the Google Cloud Storage bucket. If no, the message body is sent as is. |
Save Raw Payload? | If Yes, the raw request is saved whether or not it contains security credentials. This is used for debugging purposes. |
Custom Headers tab | NoteThis tab is available for Google Storage producers only. |
New Custom Header | You can use a key-value pair to add a custom header to any request sent by the endpoint. To create a new custom header, select New Custom Header. The New Custom Header dialog box displays:
Select Save. |
Error Handling tab | |
Custom Error Handler? | If yes, you can add custom error handling to determine how errors are handled for the endpoint. Select the type and name of the error handler. |
Flows tab | Displays all the integrations and integration flows that use this endpoint. Double-select a flow to view its details. |
Email endpoints are used to send and receive messages using the SMTP, IMAP, and POP3 protocols.
Email consumers poll email servers for emails using the IMAP or POP3 protocol, and email producers send emails using the SMTP protocol. The polling interval is 10 seconds.
Refer to the table below for guidance beginning with Step 3 in the Create an endpoint procedure above.
Steps and fields | Description |
|---|---|
Step 1 |
|
Name | Enter a relevant name for the endpoint. |
Type | The type of endpoint determines many of the unique configuration properties and behavior of the endpoint: Email - Send and receive messages using email. |
Pattern | The pattern of an endpoint determines how the endpoint can be used:
NoteAll message flows must start with a consumer endpoint that triggers a message flow run when it receives a message from an external system and will have at least one producer endpoint that sends a message to an external system. |
Step 2 |
|
Adapter | The name of the context that the endpoint runs in. |
Request Document Type | The document type passed into the endpoint by an external system. |
Response Document Type | The document type returned to an external system by the endpoint after processing. |
Step 3 | |
Protocol | The protocol of the endpoint: SMTP for producers and either IMAP or POP3 for consumers. |
Host | NoteThis option is required for Email producers only. The email server host name that the endpoint will send and receive messages to and from. |
To | The email address that the email is sent to. |
NoteThis option is available for Email consumers only. The email address for the mailbox that the endpoint will poll for messages. | |
Step 4 | |
Selector Type | Every message that X1 receives is from a sending trading partner to a receiving trading partner. As a message processing system, X1 must know which trading partner is sending the message in order to process it correctly. A consumer endpoint accomplishes this through the configuration of trading partner selectors. A consumer endpoint must identify which trading partner a received message belongs to in order to properly configure the message flow. The correct trading partner is identified according to its trading partner code. The trading partner code can be a constant value that's set for the endpoint, or the trading partner code can be extracted from the message's body using a Groovy script. Select one of the following options to determine how the endpoint identifies the sender and receiver of the message:
|
Value | Enter a sender value and a receiver value. |
After you create the endpoint, its details page displays where you can add additional information about the endpoint before approving it.
Refer to the table below for guidance after you create the endpoint but before you approve the endpoint (between Steps 5 and 6 in the Create an endpoint procedure above).
This table provides the name of each tab that contains additional fields on the Endpoint Details page.
Tabs and fields | Description |
|---|---|
General tab | |
Port | Optional: The email server port that the endpoint will send and receive messages to and from. |
From | NoteThis option is available for Email producers only. The email address that the email is sent from. Select the Script option to enter a Groovy script that will be evaluated against the message. The scripts have the `body` object available to them, which contains the message body with the envelope containing a `document` and a `header`, and the `headers` object containing the message headers. For example, to set the To field to the value of the `to` header, you would use `headers.to`. Likewise, to access a subject in the `SUBJECT` property of the document, you would use `body.document.SUBJECT`. |
To | NoteThis option is available for Email producers only. The email address that the email is sent to. Select the Script option to enter a Groovy script that will be evaluated against the message. The scripts have the `body` object available to them, which contains the message body with the envelope containing a `document` and a `header`, and the `headers` object containing the message headers. For example, to set the To field to the value of the `to` header, you would use `headers.to`. Likewise, to access a subject in the `SUBJECT` property of the document, you would use `body.document.SUBJECT`. |
Subject | NoteThis option is available for Email producers only. The subject of the email. Select the Script option to enter a Groovy script that will be evaluated against the message. The scripts have the `body` object available to them, which contains the message body with the envelope containing a `document` and a `header`, and the `headers` object containing the message headers. For example, to set the To field to the value of the `to` header, you would use `headers.to`. Likewise, to access a subject in the `SUBJECT` property of the document, you would use `body.document.SUBJECT`. |
Authorization tab | Note
|
Authorization Type |
|
Trading Partner Selector tab | This option is available for Email consumers only. |
Payload tab | |
Unwrap? | If Yes, a message that X1 sends to an external system is unwrapped from its envelope. |
Attachments Only | If Yes, process only the attachments of the email, not the body. Otherwise, the email's body is processed with the attachments. |
Log Message Headers | You can log the message headers of the message for any events that the endpoint logs. If yes, you can enter an optional "Include Headers" regular expression to specify which headers to include in the logged event. All headers are logged if you don't provide the regular expression. NoteLogging message headers can be helpful in troubleshooting, but be aware that this can expose sensitive information in the flow run events. |
Split? | If Yes, a message received by X1 from an external system is split into multiple individual messages and processed separately. In the On field, you must provide a split key which is a property in the message body to split on. |
Save Raw Payload? | If Yes, the raw request is saved whether or not it contains security credentials. This is used for debugging purposes. |
Custom Headers tab | NoteThis tab is available for Email producers only. |
New Custom Header | You can use a key-value pair to add a custom header to any request sent by the endpoint. To create a new custom header, select New Custom Header. The New Custom Header dialog box displays:
Select Save. |
Error Handling tab | |
Custom Error Handler? | If yes, you can add custom error handling to determine how errors are handled for the endpoint. Select the type and name of the error handler. |
Flows tab | Displays all the integrations and integration flows that use this endpoint. Double-select a flow to view its details. |
AS2 endpoints are used to send and receive EDI messages using the AS2 protocol.
Refer to the table below for guidance beginning with Step 3 in the Create an endpoint procedure above.
Steps and fields | Description |
|---|---|
Step 1 |
|
Name | Enter a relevant name for the endpoint. |
Type | The type of endpoint determines many of the unique configuration properties and behavior of the endpoint: AS2 - HTTP-based protocol for transferring EDI messages. AS2 endpoints send and receive messages using the AS2 protocol. You can configure AS2 endpoints to send and receive messages using a variety of AS2 operations that also let you configure the AS2 envelope and body of the message to exchange AS2-compliant EDI documents. |
Pattern | The pattern of an endpoint determines how the endpoint can be used:
NoteAll message flows must start with a consumer endpoint that triggers a message flow run when it receives a message from an external system and will have at least one producer endpoint that sends a message to an external system. |
Step 2 |
|
Adapter | The name of the context that the endpoint runs in. |
Request Document Type | The document type passed into the endpoint by an external system. |
Response Document Type | The document type returned to an external system by the endpoint after processing. |
Step 3 | |
Request URI Pattern | NoteThis option is required for AS2 consumers only. The URI that the endpoint is available on. |
Server Port Number | NoteThis option is required for AS2 consumers only. The AS2 port number of the server. |
From | NoteThis option is available for AS2 producers only. The AS2 sender. |
To | NoteThis option is available for AS2 producers only. The AS2 receiver. |
From (RFC2822) | NoteThis option is available for AS2 producers only. The AS2 sender in RFC2822 format. |
Target Host Name | NoteThis option is available for AS2 producers only. The host name of the AS2 receiver. |
Target Port Number | NoteThis option is available for AS2 producers only. The port number of the AS2 receiver. |
Message Structure | NoteThis option is available for AS2 producers only. The AS2 structure of the message to send. |
EDI Message Content Type | NoteThis option is available for AS2 producers only. The content type of the EDI message. |
Request URI | NoteThis option is available for AS2 producers only. The resource location on the target host. |
Subject | NoteThis option is available for AS2 producers only. The subject of the message. |
Step 4 | |
Selector Type | Every message that X1 receives is from a sending trading partner to a receiving trading partner. As a message processing system, X1 must know which trading partner is sending the message in order to process it correctly. A consumer endpoint accomplishes this through the configuration of trading partner selectors. A consumer endpoint must identify which trading partner a received message belongs to in order to properly configure the message flow. The correct trading partner is identified according to its trading partner code. The trading partner code can be a constant value that's set for the endpoint, or the trading partner code can be extracted from the message's body using a Groovy script. Select one of the following options to determine how the endpoint identifies the sender and receiver of the message:
|
Value | Enter a sender value and a receiver value. |
After you create the endpoint, its details page displays where you can add additional information about the endpoint before approving it.
Refer to the table below for guidance after you create the endpoint but before you approve the endpoint (between Steps 5 and 6 in the Create an endpoint procedure above).
This table provides the name of each tab that contains additional fields on the Endpoint Details page.
Tabs and fields | Description |
|---|---|
General tab | |
Consumer URL | NoteThis option is available for AS2 consumers only. The URL that the AS2 consumer listens on. |
Signing Algorithm | Optional: The AS2 algorithm used to sign the message. |
Signed Receipt MIC Algorithms | Optional: Algorithms, listed in order of preference, you can use to generate a message integrity check (MIC) returned in a message disposition notification (MDN). |
Validate Signing Certificate | NoteThis option is available for AS2 consumers only. Option: The certificate used to validate the signature. |
EDI Message Transfer Encoding | NoteThis option is available for AS2 producers only. Optional: The transfer encoding of the EDI message. |
Attached File Name Script | NoteThis option is available for AS2 producers only. Optional: A groovy script used to determine the name of the file sent to the AS2 receiver. The script must return a string that represents the name of the file to be sent. The script has access to the message body and headers. Examples: myFile.txt, body.fileName, headers.fileName, new Date().format('yyyyMMdd') + '.txt' |
Disposition Notification To | NoteThis option is available for AS2 producers only. Optional: The email address to send the disposition notification to. |
Compression Algorithm | NoteThis option is available for AS2 producers only. Optional: The compression algorithm to use. |
Encrypting Algorithm | NoteThis option is available for AS2 producers only. Optional: The AS2 algorithm used to encrypt the message. |
Encrypting Certificate | NoteThis option is available for AS2 producers only. Optional: The alias of the certificate to use for encryption. |
Upload Encrypting Certificate | NoteThis option is available for AS2 producers only. You can upload a certificate for encrypting AS2 messages, using a CSV file.
|
Authorization tab | Note
|
Authorization Type |
|
Trading Partner Seleector tab | This option is available for AS2 consumers only. |
Payload tab | |
Unwrap? | If Yes, a message that X1 sends to an external system is unwrapped from its envelope. |
Log Message Headers | You can log the message headers of the message for any events that the endpoint logs. If yes, you can enter an optional "Include Headers" regular expression to specify which headers to include in the logged event. All headers are logged if you don't provide the regular expression. NoteLogging message headers can be helpful in troubleshooting, but be aware that this can expose sensitive information in the flow run events. |
Split? | If Yes, a message received by X1 from an external system is split into multiple individual messages and processed separately. In the On field, you must provide a split key which is a property in the message body to split on. |
Save Raw Payload? | If Yes, the raw request is saved whether or not it contains security credentials. This is used for debugging purposes. |
Custom Headers tab | NoteThis tab is available for AS2 producers only. |
New Custom Header | You can use a key-value pair to add a custom header to any request sent by the endpoint. The header value can be one of the following:
To use a DSL that references a vault secret or generates a cryptographic signature, enter the corresponding DSL. The following DSLs are supported in custom headers:
To create a new custom header, select New Custom Header. The New Custom Header dialog box displays:
Select Save. |
Error Handling tab | |
Custom Error Handler? | If yes, you can add custom error handling to determine how errors are handled for the endpoint. Select the type and name of the error handler. |
Flows tab | Displays all the integrations and integration flows that use this endpoint. Double-select a flow to view its details. |
Scheduler endpoints are unique in that they do not accept any input. Instead, they trigger message flows at a specific time or regular intervals. When a scheduler endpoint is triggered, it sends a message to the next component in the message flow, which processes the message like any other. This can be used to fetch data from a remote API regularly.
Note
Scheduler endpoints are consumers only - not producers.
Refer to the table below for guidance beginning with Step 3 in the Create an endpoint procedure above.
Steps and fields | Description |
|---|---|
Step 1 | |
Name | Enter a relevant name for the endpoint. |
Type | The type of endpoint determines many of the unique configuration properties and behavior of the endpoint: Scheduler - Used to begin message flows at a specific time or at regular intervals. |
Pattern | The pattern of an endpoint determines how the endpoint can be used:
NoteAll message flows must start with a consumer endpoint that triggers a message flow run when it receives a message from an external system and will have at least one producer endpoint that sends a message to an external system. |
Step 2 | |
Adapter | The name of the context that the endpoint runs in. |
Step 3 | |
Schedule | Make your scheduling selections in the Repeat, lEvery, andAt fields Based on your scheduling selections, a cron expression is created for you automatically. |
Step 4 | |
Selector Type | Every message that X1 receives is from a sending trading partner to a receiving trading partner. As a message processing system, X1 must know which trading partner is sending the message in order to process it correctly. A consumer endpoint accomplishes this through the configuration of trading partner selectors. A consumer endpoint must identify which trading partner a received message belongs to in order to properly configure the message flow. The correct trading partner is identified according to its trading partner code. The trading partner code can be a constant value that's set for the endpoint, or the trading partner code can be extracted from the message's body using a Groovy script. Select one of the following options to determine how the endpoint identifies the sender and receiver of the message:
|
Value | Enter a sender value and a receiver value. |
After you create the endpoint, its details page displays where you can add additional information about the endpoint before approving it.
Refer to the table below for guidance after you create the endpoint but before you approve the endpoint (between Steps 5 and 6 in the Create an endpoint procedure above).
This table provides the name of each tab that contains additional fields on the Endpoint Details page.
General tab | |
Trading Partner Selector tab | |
Payload tab | |
Save Raw Payload? | If Yes, the raw request is saved whether or not it contains security credentials. This is used for debugging purposes. |
Log Message Headers | You can log the message headers of the message for any events that the endpoint logs. If yes, you can enter an optional "Include Headers" regular expression to specify which headers to include in the logged event. All headers are logged if you don't provide the regular expression. NoteLogging message headers can be helpful in troubleshooting, but be aware that this can expose sensitive information in the flow run events. |
Flows tab | Displays all the integrations and integration flows that use this endpoint. Double-select a flow to view its details. |
Tabs and fields | Description |
|---|
SQL endpoints enable secure, efficient data management through SQL database interactions.
They support the following SQL drivers:
POSTGRESQL
MY_SQL
ORACLE
SNOWFLAKE
SQL_SERVER
SQL statements in an endpoint can include variables based on the message body and header. This enables you to generate queries with runtime values dynamically. Such flexibility is beneficial for conditional data operations and advanced integration requirements.
Note
SQL endpoints are producers only - not consumers.
SQL Endpoint Operations
Each SQL operation has unique requirements and behaviors.
SQL endpoints allow the following four primary operations that are essential for data retrieval and modification:
Operation | Descriptions |
|---|---|
SELECT | Retrieves data based on defined conditions. The SQL statement must start with SELECT, and you can include variables from the message body or headers. Example: SELECT t.*
FROM public.test t
WHERE t.name = '${body.document[name]}'
AND t.surname = '${headers.surname}'
LIMIT 2; |
INSERT | Adds new records to the database. SQL statements for this operation must start with INSERT. Batch mode is available for multiple-row inserts. Example: INSERT INTO public.test (name, surname)
VALUES ('${body.document[name]}', '${headers.surname}')
RETURNING *;
|
UPDATE | Modifies existing records based on specified conditions. Statements for this operation must start with UPDATE. Batch mode is available for multi-row updates. Example: UPDATE public.test
SET name = '${body.document[newName]}'
WHERE name = '${headers.oldName}'
RETURNING *; |
DELETE | Removes records from the database based on the given conditions. SQL statements for this operation must start with DELETE. Example: DELETE
FROM public.test
WHERE name = '${body.document[name]}'
AND surname = '${headers.surname}'
RETURNING *; |
Refer to the table below for guidance beginning with Step 3 in the Create an endpoint procedure above.
Steps and fields | Description |
|---|---|
Step 1 | |
Name | Enter a relevant name for the endpoint. |
Type | The type of endpoint determines many of the unique configuration properties and behavior of the endpoint: SQL - A standard language for accessing and manipulating databases. |
Pattern | The pattern of an endpoint determines how the endpoint can be used:
NoteAll message flows must start with a consumer endpoint that triggers a message flow run when it receives a message from an external system and will have at least one producer endpoint that sends a message to an external system. |
Step 2 | |
Adapter | The name of the context that the endpoint runs in. |
Request Document Type | The document type passed into the endpoint by an external system. |
Response Document Type | The document type returned to an external system by the endpoint after processing. |
Step 3 | |
Datasource | The database connection details, including host, port, and authentication. Datasource Properties:
|
Manage Datasources | Select to display a dialog box where you can view, create, edit, and delete datasources. |
Operation | Specifies the SQL operation type (SELECT, INSERT, UPDATE, DELETE). |
Statement | The query or command to execute, which may contain variables for dynamic values. |
After you create the endpoint, its details page displays where you can add additional information about the endpoint before approving it.
Refer to the table below for guidance after you create the endpoint but before you approve the endpoint (between Steps 5 and 6 in the Create an endpoint procedure above).
This table provides the name of each tab that contains additional fields on the Endpoint Details page.
Tabs and fields | Description |
|---|---|
General tab | |
Batch Mode? | NoteThis option is available for the INSERT and UPDATE operations only. Batch Mode enables you to process multiple rows in a single operation. |
Payload tab |
|
Log Message Headers | Select to log the message headers in flow run events related to this component. |
Flows tab | Displays all the integrations and integration flows that use this endpoint. Double-select a flow to view its details. |
Kafka endpoints send and receive messages via the Kafka protocol using a Kafka message broker. Kafka endpoints enable configuring properties as required by the broker.
Refer to the table below for guidance beginning with Step 3 in the Create an endpoint procedure above.
Steps and fields | Description |
|---|---|
Step 1 | |
Name | Enter a relevant name for the endpoint. |
Type | The type of endpoint determines many of the unique configuration properties and behavior of the endpoint: Kafka - Kafka isn't a request/response protocol, so Kafka endpoints only allow you to configure a Request Document Type that represents the input document type the endpoint receives (in the case of a consumer) or sends (in the case of a producer). There is no response (output) document type for Kafka endpoints. |
Pattern | The pattern of an endpoint determines how the endpoint can be used:
NoteAll message flows must start with a consumer endpoint that triggers a message flow run when it receives a message from an external system and will have at least one producer endpoint that sends a message to an external system. |
Step 2 | |
Adapter | The name of the context that the endpoint runs in. Adapters provide the runtime environment for components to execute in. They're siloed from each other so that components running in one adapter cannot access components running in another adapter. Adapters provide the ability to scale contexts independently. This can be useful in high-volume scenarios, where one adapter can be scaled up to handle more load while another can be scaled down to save resources. It also allows one adapter to fail without affecting the other adapters. This type of isolation isn't necessary unless there are specific performance or isolation requirements. In most cases, a single adapter is sufficient to handle high volumes of messages. If multiple adapters are available, you must select the adapter in which each component you create runs. If only a single adapter is available, each component is automatically assigned to that adapter and cannot be changed. |
Request Document Type | The document type passed into the endpoint by an external system. |
Step 3 | |
Topic | The Kafka topic that the endpoint sends and receives messages to or from. |
Bootstrap Servers | A comma-separated list of Kafka bootstrap servers (Example: localhost:9092). |
Security Protocol | The security protocol used to communicate with the Kafka cluster. Options include PLAINTEXT, SASL_PLAINTEXT, SASL_SSL, and SSL. |
SASL Mechanism | The SASL mechanism used for authentication when SASL_PLAINTEXT or SASL_SSL is selected as the security protocol. Options include PLAIN, SCRAM-SHA-256 and SCRAM-SHA-512. |
Step 4 | NoteThis step is available for Kafka consumers only. |
Selector Type | Every message that X1 receives is from a sending trading partner to a receiving trading partner. As a message processing system, X1 must know which trading partner is sending the message in order to process it correctly. A consumer endpoint accomplishes this through the configuration of trading partner selectors. A consumer endpoint must identify which trading partner a received message belongs to in order to properly configure the message flow. The correct trading partner is identified according to its trading partner code. The trading partner code can be a constant value that's set for the endpoint, or the trading partner code can be extracted from the message's body using a Groovy script. Select one of the following options to determine how the endpoint identifies the sender and receiver of the message:
|
Value | Enter a sender value and a receiver value. |
Step 5 | |
Authorization Type | Select one of the following Authorization Types:
|
User Name | Enter the username. |
Password | Enter the password. |
After you create the endpoint, its details page displays where you can add additional information about the endpoint before approving it.
This table provides the name of each tab that contains additional fields on the Endpoint Details page.
Tabs and fields | Description |
|---|---|
General tab | Field descriptions are in the table above. |
Authorization tab | Field descriptions are in the table above. |
Trading Partner Selector tab | NoteThis tab is available for Kafka consumers only. Consumer endpoints must determine the Trading Partners associated with the message to configure the flow. The consumer endpoints do this by selecting the Trading Partner Codes using configured values. The selector can be one of the following:
|
Payload tab | |
Log Message Headers | You can log the message headers of the message for any events that the endpoint logs. If yes, you can enter an optional "Include Headers" regular expression to specify which headers to include in the logged event. All headers are logged if you don't provide the regular expression. NoteLogging message headers can be helpful in troubleshooting, but be aware that this can expose sensitive information in the flow run events. |
Split? | If Yes, a message received by X1 from an external system is split into multiple individual messages and processed separately. In the On field, you must provide a split key which is a property in the message body to split on. |
Save Raw Payload | If Yes, the raw payload of the message will be saved as a file, which can be viewed under the Files context window option for Flow Runs. |
Custom Headers tab | NoteThis tab is available for Kafka producers only. |
New Custom Header | You can use a key-value pair to add a custom header to any request sent by the endpoint. The header can be one of the following:
To use a DSL that references a vault secret or generates a cryptographic signature, enter the corresponding DSL. The following DSLs are supported in custom headers:
To create a new custom header, select New Custom Header. The New Custom Header dialog box displays:
NoteIf you use a dot (.) delimited selector, the header value is determined dynamically at runtime. The selector must start with either body or headers, depending on whether the value to be used in the header is in the message body or message headers. For example, to add a header with a value of the id field in the message body, enter body.id. To add a header with a value of the id field in the message headers, enter headers.id. The selector can be multiple levels deep, such as body.customer.id.request body. Select Save. |
Error Handling tab | |
Custom Error Handler? | If yes, you can add custom error handling to determine how errors are handled for the endpoint. Select the type and name of the error handler. |
Flows tab | Displays all the integrations and integration flows that use this endpoint. Double-select a flow to view its details. |
In the Endpoints table, do one of the following:
Next to an endpoint, select
 . The Endpoint Details page displays the General tab by default.
Select an endpoint's ID, Name, Type, or Pattern. The Endpoint Details page displays the General tab by default.
In the top right corner of the page, select New Draft.
Note
If you want to delete the draft before saving it, select
.Edit the endpoint information.
In the top right corner of the page, select Save >Approve.
Note
When you select Save, your edits are saved as an unapproved draft.
At this point, you can leave the saved draft unapproved if you want to come back to it later to do more editing.
When you want to edit the component again, in the top right corner of the page, select Show Draft to access its unapproved draft.
When you select Approve, the unapproved draft is deployed as the current version.
In the top right corner of the page, you can select the drop-down arrow to revert to a previous version.

To the left of the drop-down list, you can select
 to view when the page was last modified.
Next to an endpoint, select
 . The Confirm Export dialog box displays.
Select Yes.
An enabled endpoint sends and receives messages. A disabled endpoint doesn't send or receive messages and will throw an error if it receives a message.
Note
You can disable an endpoint's status temporarily without deleting it and then enable it again anytime.
In the Endpoints table, do one of the following:
Next to an endpoint, select
. The Endpoint Details page displays the General tab by default.Select an endpoint's ID, Name, Type, or Pattern. The Endpoint Details page displays the General tab by default.
In the top left corner of the page, select to enable or disable the endpoint.
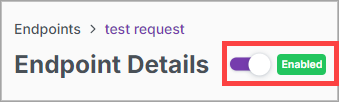
In the Confirm Enable dialog box, select Enable.
In the Endpoints table, do one of the following:
Next to an endpoint, select
. The Endpoint Details page displays the General tab by default.Select an endpoint's ID, Name, Type, or Pattern. The Endpoint Details page displays the General tab by default.
In the top right corner of the page, select Restart. The Confirm Restart dialog box displays.
Select Yes.
Next to an endpoint, select
 . The Delete Endpoint dialog box displays.
Select Delete.