Integrations
An integration is a communication link shared by two trading partners for the purpose of exchanging information.
X1 enables you to create and configure integrations and their message flows.
Before you create the integration, though, your first step is to create the trading partners for the integration.
The Integrations page is where you can view and create your integrations with various trading partners.
On the Integrations page, view the list of integrations.
Search for an integration
On the Integrations page, you can search for a specific integration using the default search fields.

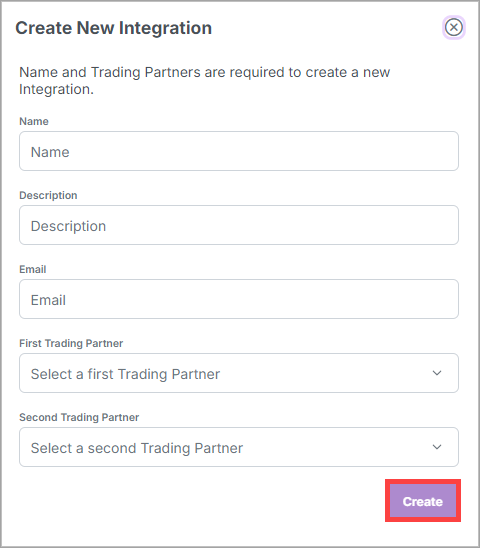
In the top right corner of the page, select Create Integration.

In the Create New Integration dialog box, enter the integration information, and select Create.
Note
A pair of integrated trading partners can have only one integration set up between them.
Note
Integrations are created with a disabled status by default. See Enable or disable an integration status for more information.
See the "Create New Integration Field Descriptions" below for more information about the integration fields.
Create New Integration Field Descriptions
Field | Description |
|---|---|
Name | Enter a unique name for the integration. |
Description | Optional: Enter a relevant description of the integration. |
Optional: The email address that receives notifications for the integration. | |
First Trading Partner | The first trading partner in the integration. |
Second Trading Partner | The second trading partner in the integration. |
In the Integrations table, do one of the following:
Next to an integration, select
 . The Integration Details page displays.
Select an integration's Name. The Integration Details page displays.
Select the Trading Partners tab.
Edit the information.
In the top-right corner of the page, select Save.
Note
In the top right corner of the page, you can select the drop-down arrow to revert to a previous version.
To the left of the drop-down list, you can select
 to view when the page was last modified.
See the "Integration Trading Partner Field Descriptions" below for more information about the integration trading partner fields.
Integration Trading Partner Field Descriptions
Code and trading partner code scenario example
Ligune Logistics (LL) and Waterside Widgets (WW) are integrated trading partners in X1.
LL sends messages to a dedicated REST endpoint. The messages don't identify themselves, so the default LL ID (LL001) is used for the LL trading partner code. WW's default ID (WW001) is used to identify it in the same manner.
When LL sends a message to WW, the "To" field contains the trading partner code for WW (W-0432). Remember, the trading partner code is how LL identifies WW - not how WW identifies itself.
Summary:
Ligune Logistics code: LL001
Ligune Logistics trading partner code: LL001
Waterside Widgets code: WW01
Waterside Widgets trading partner code: W-0432
In the Integrations table, do one of the following:
Next to an integration, select
. The Integration Details page displays.Select an integration's Name. The Integration Details page displays.
On the Rate Limiter tab, select the Rate Limiter toggle option.
In the Limit field, enter the message number limit.
In the Window field, enter the time in seconds
An integration message flow is a sequence of components, such as endpoints, processors, translators, and routers (more information about components below). These components are chained together to enable the exchange of specific document types.
The document type determines if the output of one component is compliant with the expected input of another component. So, as you build an integration message flow, you can only chain together components with the same document types. For example, if a translator outputs a Ligune Logistics document request, the next component in the integration message flow sequence must have a Ligune Logistics document request as its input.
An integration can have multiple message flows. The components of each message flow are executed in order, so the output of a component is the input of the next component in the sequence.
In the Integrations table, do one of the following:
Next to an integration, select
. The Integration Details page displays.Select an integration's Name. The Integration Details page displays.
On the Flows tab, select New Flow.
The Flow Designer page displays.
The Flow Designer is the interface for creating and editing message flows. It's a visual drag-and-drop interface that displays the message flow components so you can add, remove, and configure them.
Note
When you create a new component, you must approve it before you can add it to a flow.
At the bottom of the page, in the Properties Panel, enter a name for the message flow and then select the sending trading partner and the receiving trading partner.
Select Save Documents to save the documents to the X1 database.
Note
Disabling this option removes your ability to search and view the documents processed by the flow.
Next, you'll add an endpoint. There are multiple endpoint types available for you to choose from (see the "Endpoint Descriptions" below).
Drag an endpoint type from the sidebar and drop it on the integration flow surface. The Component Selector dialog box displays.
Select an endpoint component from the drop-down list, and select Add.
Note
If you want to create a new endpoint component to add to the drop-down list, select Create new. Then, enter a name and select Create.
Endpoint Descriptions
Rest - Representational State Transfer. A flexible API architecture that transmits a document typically in JSON format over HTTP.
FTP - File Transfer Protocol. A network protocol for transmitting files between systems over TCP/IP connections.
Rabbit - A message broker that acts as middleware between various services, such as web applications.
Soap - Simple Object Access Protocol. A highly-structured messaging protocol that transmits a document in XML format over a variety of internet protocols (HTTP, SMTP, JMS, and more).
Google Storage - Send messages to or consume messages using a Google storage bucket.
Email - Send messages (SMTP) or receive messages (IMAP) using an email address.
AS2 - An HTTP-based protocol used to transmit messages, primarily EDI messages.
Note
After adding an endpoint, you can then add the various other integration flow components, such as processors, translators, and routers.
This is explained in steps 5 - 7 below:
There are multiple processor types available for you to choose from (see the "Processor Descriptions" below).
Drag a processor type from the sidebar and drop it on the integration flow surface. The Component Selector dialog box displays.
Select a processor component from the drop-down list, and select Add.
Note
If you want to create a new processor component to add to the drop-down list, select Create new. Then, enter a name and select Create.
Processor Descriptions
Composed Message - Splits a message on a particular key and processes it as a sub-flow of one or more components. It serves as a "wrapper" for other components.
EDI File - Handles EDI files according to EDI requirements. It also extracts transaction sets from the EDI files, validates them, and then maps them into a JSON representation.
Enrichment - Adding or editing data in a message, such as converting to the local timezone of a stop's location. Enrichment requires an endpoint to send a request to and a translator to enrich the message. It serves as a "wrapper" for other components.
Validation - Validates messages using one or more configurable rules. The validation is done using Groovy scripts. Invalid messages will generate error emails or be sent to Dead Letters, depending on the selections in Settings.
There are multiple translator types available for you to choose from (see the "Translator Descriptions" below).
Drag a translator type from the sidebar and drop it on the integration flow surface. The Component Selector dialog box displays.
Select a translator component from the drop-down list, and select Add.
Note
If you want to create a new translator component to add to the drop-down list, select Create new. Then, enter a name and select Create.
Translator Descriptions
Message - Used for translating between a source and a target document type. Translates messages from the sender's schema to the consumer's schema.
Enrichment - Used by the enrichment processor to enrich the original message.
There is one router type available for you to choose (see the "Router Descriptions" below).
Drag the router type from the sidebar and drop it on the integration flow surface. The Component Selector dialog box displays.
Select a router component from the drop-down list, and select Add.
Note
If you want to create a new router component to add to the drop-down list, select Create new. Then, enter a name, adapter, input document type, output document type, and select Create.
Router Descriptions
Content Based - Similar to a validation processor in that users write configurable rules for it using Groovy scripts.
In the top right corner of the page, select Save.
Note
In the top right corner of the page, you can select the drop-down arrow to revert to a previous version.
To the left of the drop-down list, you can select
to view when the page was last modified.
If you have a second instance of X1 for testing, you can create a flow in it, test the flow with your trading partners, export the flow, and then import the flow into your X1 instance used for production. When you import the flow, everything (including the components) is recreated.
In the Integrations table, do one of the following:
Next to an integration, select
. The Integration Details page displays.Select an integration's Name. The Integration Details page displays.
Next to the New Flow button, select the drop-down arrow, and select Import Flow.
In the Import Flow dialog box, drag and drop a document, or select Choose and browse to it.
Select Upload. The imported integration message flow is added to the Flows tab.
Message flows in the flow designer are displayed in read-only mode.
To edit a flow in the flow designer, first create a draft of the flow. Then you can make changes to the flow and save it as a draft.
After you save the draft, you can approve the draft to make it the current version of the flow.
In the Integrations table, do one of the following:
Next to an integration, select
. The Integration Details page displays.Select an integration's Name. The Integration Details page displays.
On the Flows tab, next to the Status column for an integration flow, select
.In the top right corner of the page, select New Draft.
Note
If you want to delete the draft before saving it, select
 .
.Edit the information.
In the top right corner of the page, select Save.
Note
In the top right corner of the page, you can select the drop-down arrow to revert to a previous version.
To the left of the drop-down list, you can select
to view when the page was last modified.To make your draft the current version and deploy it, select Approve.
When you export a flow, it exports a JSON representation of the flow and every component in the flow. Then, when you import the flow, everything (including the components) is recreated.
In the Integrations table, do one of the following:
Next to an integration, select
. The Integration Details page displays.Select an integration's Name. The Integration Details page displays.
On the Flows tab, next to the Status column for an integration message flow, select
 . The Confirm Export dialog box displays.
Select Yes.
In the Integrations table, do one of the following:
Next to an integration, select
. The Integration Details page displays.Select an integration's Name. The Integration Details page displays.
On the Flows tab, select the All Flows Enabled/Disabled toggle.
In the Integrations table, do one of the following:
Next to an integration, select
. The Integration Details page displays.Select an integration's Name. The Integration Details page displays.
On the Flows tab, next to the Status column for an integration message flow, select
 . The Confirm Deletion dialog box displays.
Select Yes.
An enabled integration processes messages. A disabled integration doesn't process messages and will throw an error if it receives a message.
Note
You can disable an integration's status temporarily without deleting it and then enable it again anytime.
In the Integrations table, do one of the following:
Next to an integration, select
 to enable or
  to disable.
In the Confirm dialog box, select Enable or Disable.
Select an integration Name. The Integration Details page displays the Flows tab by default.
In the top left corner of the page, select to enable or disable the integration.
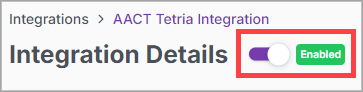
In the Confirm dialog box, select Enable or Disable.
In the top right corner of the page, select Save.
Note
In the top right corner of the page, you can select the drop-down arrow to revert to a previous version.
To the left of the drop-down list, you can select
to view when the page was last modified.
Note
Deleting an integration will delete the flows but not the components that make up the flows. Each component is an individual unit that can be used in multiple integrations.
Next to an integration, select
. The Delete Integration dialog box displays.Select Delete.